You can create horizontal and vertical guides. To do this, position the mouse on a ruler, press and hold the mouse button and release it again in the workspace. A position dialog will then appear, allowing you to enter the exact position. The new guide is aligned in the same direction as the originally selected ruler. You can then move the guides around as you wish.
A catch function helps you to position objects directly on the guide. This function does not connect the objects permanently to the guide but merely helps you when positioning objects.
If you hold down the CTRL key when you move the guide, the objects connected to the guide will be moved as well.
The options relating to guides are defined via a context menu which appears when you click the right mouse button. This lets you choose a catch range in pixels for each guide. When you come within this range, the object will be drawn to the guide. The catch function is switched off if you hold down the CTRL function when working with objects. When drawing new objects in the workspace, the top left corner must be placed next to the guide so that the object will be connected to the guide.
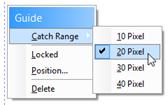
Figure 3.20: Context menu for guides
You can fix the guides in the workspace and prevent them from being moved by mistake. You can also specify the position of the guide directly.